Showing posts with label team chocolate. Show all posts

Thursday, December 20, 2012

Paleo (-"ish") Cookie Exchanging, And A Sun Butter Buckeye Bon BonRecipe

This is what I call a cookie group hug.
Heh heh. Nut sack. :)

Our Crossfit box's cookie exchange was today! We did things "paleo-ish" - gluten free and no canola oil or soybean oil. I was blown away by how many signed up to participate.

We had a great turn out, and so many different kinds of cookies - almond biscotti, no-bakes, pistachio-cranberry bark, chocolate chip, eggless egg-nog, samoas, soft ginger, and many more. One creative lady brought decorative favor bags filled with nuts as her contribution!

We gathered around and sorted cookies into boxes - some kind souls brought in some mimosas for the volunteers. Within about half an hour we had the boxes mostly packed and ready. 

I'm so grateful - even though I'm my December sugar detox has tapered off and my youngest can't eat refined sugars, my husband and oldest daughter will get to share some daddy-daughter dates over hot chocolate and some wholesome treats as Christmas draws near.
Noms!
I mean, will you look at those beautiful paleo samoas?! My friend used the Real Sustenance samoa recipe.
And of course, always nice to have classic (paleo) chocolate chip cookies around.
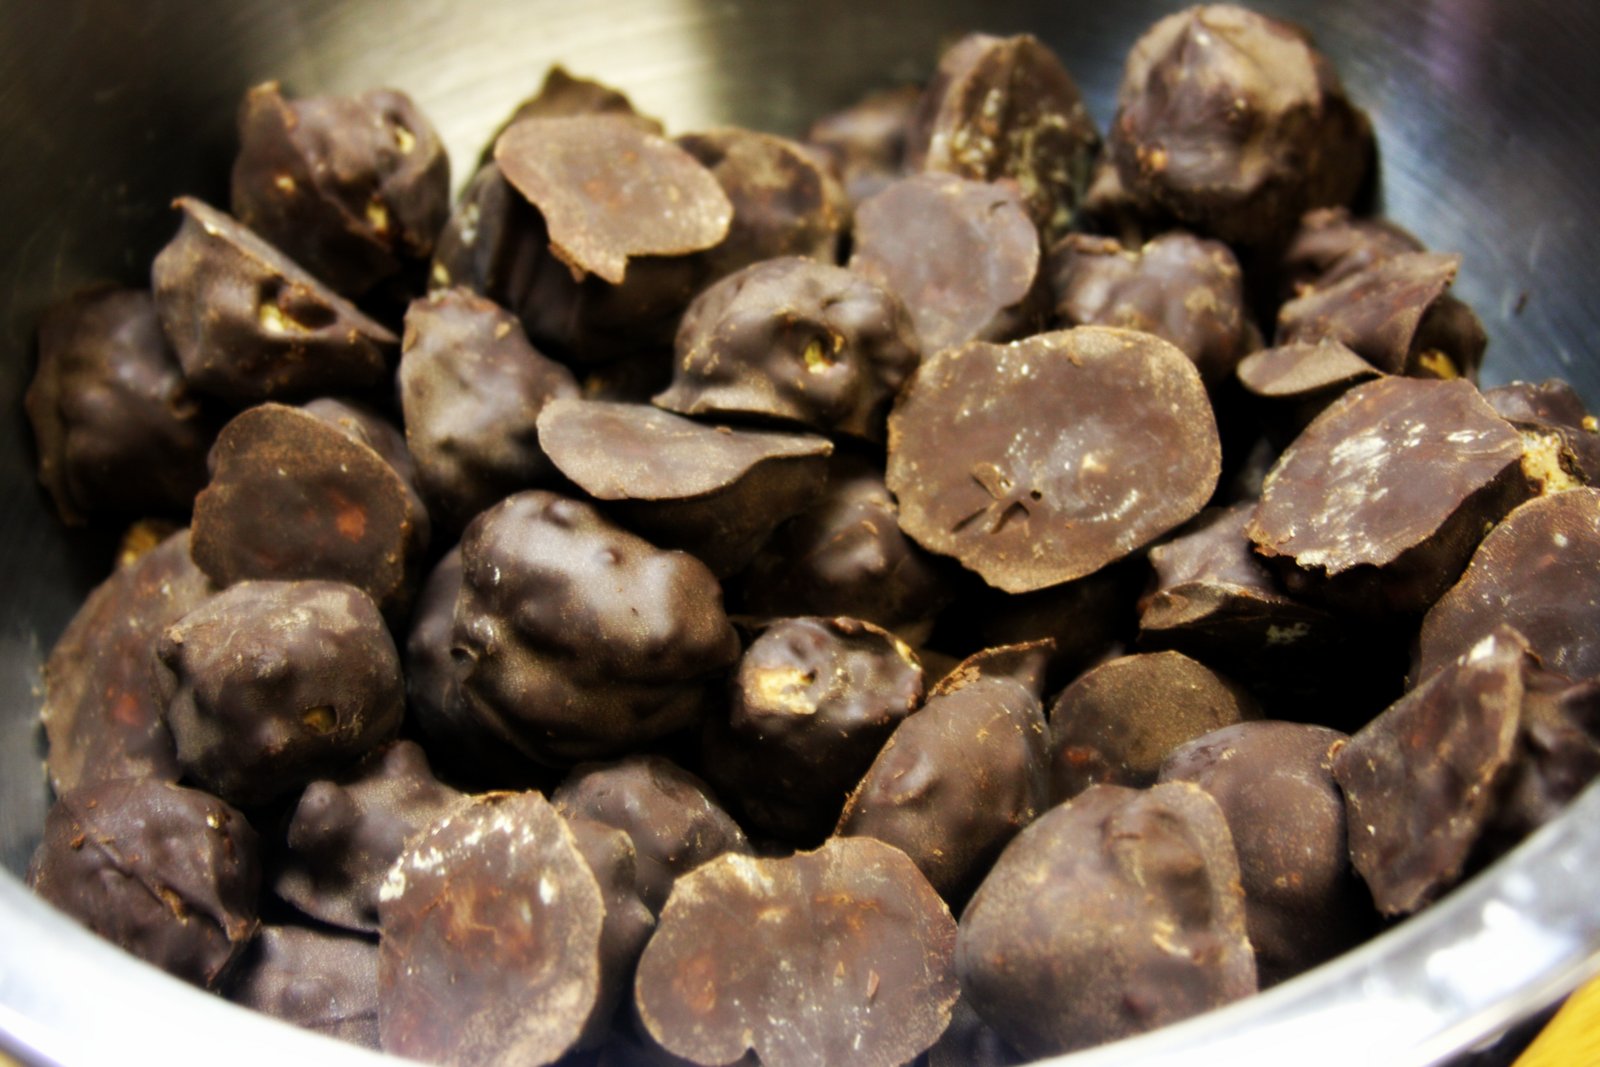
Sun butter buckeyes. Legume-free, gluten-free, dairy-free, egg-free.
My contribution to the exchange was sun butter buckeyes. I saw a recipe for peanut butter buckeyes here and adapted it with sun butter and also made it dairy-free. I subbed coconut oil for the vegetable oil. I also halved the powdered sugar with no noticeable detriment to the taste.

Sunbutter Buckeye Bon Bons
Makes approximately 5 dozen

2 cups sun butter (mine for this came in bulk sweetened with sugar but you can order organic unsweetened, too)
½ cup palm shortening
1 teaspoon vanilla
3 cups crispy rice cereal (I used Erewhon organic cocoa; 1 box is 6 cups so this recipe uses half a box)
2 cups powdered sugar
Semi-sweet chocolate chips (I used Enjoy Life allergen-friendly chocolate chips)
1 tablespoon coconut oil

Warm the palm shortening on the stove or microwave until soft. Mix with Sunbutter and vanilla in a bowl with a mixer until blended through. Add rice cereal and powdered sugar, and continue to mix until thoroughly blended.

Using a teaspoon, measure out balls of the sunbutter "dough" onto wax paper on a cookie sheet or cake pan. Freeze thoroughly - at least an hour. You will probably need a lot of free freezer space for 5 dozen of these.

Melt the coconut oil and chocolate chips in the microwave and stir until smooth.Take the frozen balls out of the freezer about a dozen at a time. Using a slotted spoon, lower a frozen sunbutter ball into the melted chocolate and drop it back on wax paper. Every dozen that you finish dipping, place them back in the freezer to set some more (another 30 minutes).

Store in the freezer in an airtight container (for up to several weeks) or in the fridge if you are consuming soon.


What more wholesome treats did you bake up this year?

This post contains Amazon affiliate links. Shopping Amazon through Primal Kitchen affiliate links supports Primal Kitchen at no additional cost to you, so thank you!!

Thursday, October 11, 2012

Boo Bites (Paleo / GAPS Diet Halloween Treats)

Boo!
These little guys came to me in a moment of inspiration. I was already mixing up a batch of coconut manna and honey, with a pinch of sea salt. My copy of the GAPS book suggests that patients with blood sugar regulation issues might benefit from taking a combo of coconut oil and honey between meals, and I think that in my youngest daughter's case, having this combo around every other day or so has helped to keep her calories up and her blood sugar from crashing.

I was mixing the stuff up when I thought to myself how like playdough its consistency was. All of a sudden I knew what I could do; I rolled the "dough" into little balls, flattened the balls, and then pinched out little wispy ghost feet. Two miniature allergen-friendly chocolate chips for eyes and a raisin for a mouth going, "OoooOooooo!" and my Boo Bites were born. My 5 year old gets a huge kick out of these and likes to make ghost noises when she is talking about them. While I think they would be cute in lunches, they do require a certain amount of cold, so it would have to be in a lunchbox containing an ice pack, or one kept in the fridge.

This is a great, safe kitchen project for kids to help! The ghosts don't have to look perfect, and the decoration of the eyes and mouths will definitely keep your little ones busy.

While GAPS keeps sugar absolutely out of the diet (and thus mini chocolate chips with sugar are a no-go), you could easily cut a raisin into two smaller pieces for the eyes, making the treat consist of coconut manna, honey, sea salt, raisins, and if desired, GAPS-legal vanilla. Presto! Totally GAPS compliant. Another option for the eyes could be a couple of unsweetened cacao nibs.

Boo Bites
Makes 6

Ingredients
  • 1/2 cup coconut manna, slightly warm and soft*
  • 3-4 tablespoons honey (adjust to your sweetness preference, buy locally or find a good quality one online)
  • Pinch sea salt
  • 1/2 tsp. vanilla extract (Rodelle is one gluten free, junk free option)
  • Raisins, for decoration
  • Mini chocolate chips, appropriate to your dietary needs (I like the allergen-free Enjoy Life chips)
  • A tray or dish lined with parchment paper or wax paper, the right size to fit into your freezer

*One way to soften your coconut manna is to put about 1" of hot water in a larger bowl, and then place a smaller bowl containing the coconut manna into the larger bowl, double-boiler style. After about 10 minutes the coconut manna should be nicely malleable. Remember that coconut manna consistency varies from brand to brand and even jar to jar - you are going for a play-doh style consistency, so if it seems too runny, add more manna. Not runny enough? A little more honey, or even a little added coconut oil.

Directions

Stir together all ingredients except for the raisins and chocolate chips. See above notes on consistency; once you have achieved a nice doughy consistency, roll a chunk of mix into the size of a large marble. Flatten the ball, and then use your fingertips to "pinch out" some ghost feet. Place the ghost on the parchment paper. Repeat with the rest of the coconut "dough" until all the ghosts are made. Decorate the ghosts with the chocolate chips for eyes and the raisins for mouths. Place the dish into the freezer to allow them to set. Serve chilled.


This post is participating in Stacy and Matt's annual Paleo Parents Halloween Recipe Roundup.

This post contains Amazon affiliate links. Shopping Amazon through Primal Kitchen affiliate links supports Primal Kitchen at no additional cost to you, so thank you!!

Wednesday, December 7, 2011

Real Food Advent Calendar: December 7 - Coconut "Milk and Honey" Walnut Cups

The Israelites wandered for 40 years in the desert before finally arriving at their promised land, a, "...land flowing with milk and honey."

Sometimes - say, in learning how to eat right and to get active - even when you want the fastest path from A to B, it turns out that you need the journey, even a journey that's more roundabout. By the time you finally do reach point B of figuring out what works for you, your very character has been changed for the better because of the process.

Commemorating a final "milk and honey" goal is a little cup with chocolate on the bottom, and on top, melted coconut oil mixed with warmed coconut manna (which mimics the creaminess of coconut milk) and a trace of honey. I dropped in a few walnut pieces to give it crunchy texture and popped the whole thing in the freezer to set.

Meanwhile, to fit the idea of the process being of importance, is an egg of Silly Putty - because it is God with the end point in mind, and He is the Sculptor of our destinies. A "common use" does not denote "unvaluable" - a common water jug used every day is very valuable in its services offered - and thus is of equal importance to some finely sculpted unique object d'art. So - do not worry about whether your destiny is common or noble. Rest in the knowledge that it is valuable and fully in God's hands either way.

Saturday, December 3, 2011

Real Food Advent Calendar: December 3 - The Value of Traditional Ways

Now over a year and a half into this traditional foods / paleo lifestyle, I'm learning so much about how folks were preparing foods just a couple of generations ago. So, the Proverbs verse really rings true to me in this context; it heralds the value of learning the passed on knowledge of one's elders, like a precious necklace.

As for the chocolate covered hazlenuts, I thought that the slightly sweet dark chocolate outside and mildly bitter crunchy inside were good illustrations of the outside/inside analogy of people. Hopefully my daughter can remember as much even as she munches through them. :)

To make these, I simply melted a small handful of dark chocolate chips in a microwave safe dish in the microwave, then I stirred the chocolate until smoothly melted. I tossed a small handful of hazlenuts into the bowl and stirred them until they were evenly coated. I then spooned the hazlenuts onto parchment paper to cool before popping them into their mini silicone muffin cup.

Thursday, December 1, 2011

Real Food Advent Calendar: December 1 - Coconut Manna Walnut Cups

Psalm 150
Quite the jamboree, eh? I am a person who really gets into Christmas music - I have it on almost constantly from mid-November through the New Year. I saw this little drum and thought it the perfect reminder that sometimes a good worship jam session can get me and my daughter better mentally prepared to herald the celebration of Christ's arrival. It doesn't have to be lingering fireside carols (though I enjoy those too!) - a couple of exuberant tunes with high octane drums and guitars courtesy of Relient K gets us from 0 to 60 in no time flat. :)

Drumming Up Some Christmas Worship by C on Grooveshark


Exodus 16:4-5

Now for the December 1st advent calendar treat! These are very, very easy to make - and take less than 5 minutes. I like that they involve coconut manna - it reminds me of the fact that God gives us exactly what we need, exactly when it is needed. (It's learning to trust in that fact that is the hardest part for me!)

Coconut Manna Cups
Makes about 6 cups

Ingredients
1/2 cup high quality dark chocolate chips
3 tablespoons coconut butter or coconut manna (or coconut butter)
6 walnut halves

Directions
In a microwave, melt the chips in a microwave-safe bowl on half power (this should take a minute or two). Stir the melted chocolate until it is completely smooth. Pour just a bit of melted chocolate in the bottom of six mini silicone muffin cups (or silicone mini muffin cup liners). Use a teaspoon to spread the melted chocolate from the bottom of the cup up the side.

Allow the chocolate in the cups to cool for a bit.

On top of the chocolate in the cups, add 1/2 tablespoon of crumbled coconut manna and a walnut half broken into 2 or 3 pieces. Top these with more melted dark chocolate and use the teaspoon to smooth it over.

Place the manna cups in the freezer to further set, if desired.

Wednesday, November 30, 2011

New Series Coming This Week: The Real Food Advent Calendar, a Healthier Alternative


I'm super excited!!  A few weeks ago, I bought a "fill your own" advent calendar at IKEA, and starting tomorrow, December 1, I am going have a daily post through Christmas on the calendar's compartments' contents.

Advent is a special season built on anticipation - for Christians it's when we remember how long the world waited for our Savior, as we (in microcosm) now eagerly await the celebration of his birth. I loved advent calendars as a kid -- doing the countdown to Christmas was that much more special having a calendar to watch and a little daily treat (usually chocolate) to enjoy.

These days, advent calendars can be found in a wide range of prices and qualities - some can be had at a dollar store, while others can be purchased from high end chocolatiers, and feature very high quality chocolate.

As for us and our IKEA special, I enjoyed both the idea of knowing exactly what ingredients went into the treats and the ability to add a something more than just chocolate to those cute compartments - a little toy or ornament, perhaps, that my oldest could enjoy finding. It allowed me to customize the calendar exactly for my 4 year old's attention span and interest levels. In our house, we'll read a bit of scripture while opening our daily countdown drawer as well, which I hope adds to our sense of anticipation as we celebrate Christ's arrival as Emmanuel - "God with us".

Some strategies for this project:

  • I'll be using minimuffin cup liners to separate the treat from the toy inside each compartment. (Mine are silicone but disposable would work equally well.)

  • I'll be using the dollar store and the dollar section at Target for toy resources. (This project is also another great reason to surf the Target dollar section's seasonal stuff just after a holiday expires to get little fun items for pennies on the dollar.)

  • Lest you think I've already completely filled the calendar's compartments, nope! I'm only about three days out right now. My plan is to go in 3-4 day chunks of filling the drawers, which will hopefully be a doable pace. Maybe next year I'll have the benefit of experience on this and be more ahead of the game. ;-)

  • The treats will be varied in their real food content. Some might include dairy, or nuts, or eggs - and some small amounts of sugar in the form of high quality dark chocolate. The treats will all be gluten-free, however. If your household doesn't eat one or more of those ingredients and you're still hoping to fill an advent calendar of your own, then feel free to adapt or come up with treats that are better suited to your family's dietary restrictions instead!
To see all of my Real Food Advent Calendar 2011 posts, click here.

Are you and your family doing advent calendars this year? How do you celebrate the countdown to Christmas?

Tuesday, October 25, 2011

Chocolate Mousse Topped with Sliced Almonds and Cacao Nibs


I first saw the idea of combining cocoa powder and avocado in Girl Gone Primal's Choc Avocado Mousse. I'd made variations on it a few times since then. It had been a while since I'd given it another go, but this time it turned out especially tasty. My preschooler loved it packed in her lunchbox, and I'll admit that I very much enjoyed the rest for breakfast! :)

There are some great reasons to give this simple desserty dish a go:
  • You don't need to worry about avocados oxidizing and turning the dish an unappetizing shade of brown - the cocoa powder already makes it a rich chocolatey brown from the get-go! Thus it is great for making ahead, even for packed lunches.
  • Overripe avocados - which might otherwise be tossed - are perfect for this purpose - the especially soft, ripe ones make the lightest, fluffiest mousse.
  • You get a good dose of fat and antioxidants, with a little sweetness. Adjust the sweetness by adding or subtracting honey according to your dietary requirements and taste!

Chocolacado Mousse
Serves 2 generously

Ingredients
2 avocadoes, very ripe
2 tablespoons honey
2 tablespoons cocoa powder
1 tablespoon vanilla extract

Directions
Combine ingredients in a food processor or blender and blend thoroughly. Serve topped with sliced almonds and organic unsweetened cacao nibs, or the nuts and fruit of your choice.


~

This post contains Amazon affiliate links. Shopping Amazon through Primal Kitchen affiliate links supports Primal Kitchen at no additional cost to you, so thank you!!

Sunday, October 16, 2011

Gluten Free Grain Free Soul Cakes


This post is also a part of Slightly Indulgent Tuesday.

Back in the day, it was a Catholic tradition for soulers to come calling to households, offering to say prayers for the dead in honor of All Saints' Day - and their reward came in the form of small round cakes, called soul cakes, which were often baked with raisins, currants, or other dried fruits, frequently with the shape of a cross as a way of signifying that the cakes were a kind of alms. It was an Ur-trick-or-treating.

I identify as a mixed-bag flavor of Protestant, but that doesn't stop me from loving the idea of baking up some commemorative tea cakes around Halloween and All Saints' Day, which we could enjoy while reflecting on the lives of those loved ones we'd lost in the last year.

These paleo-fied soul cakes have a hearty coconut flour shortbread, and a bittersweet chocolate base with cranberries, cacao nibs, and sliced almonds. A single cake is very rich. I chose bittersweet chocolate to signify the bittersweetness that comes with remembering loved ones gone - but you could chose a sweeter chocolate depending on the tastes of your crowd.

I have a palate that appreciates rich but not sweet desserts - thus I enjoy that the shortbread itself is not super sweet, but is still offset by the sweeter trail mixy chocolate base. You could sweeten the shortbread additionally to taste with palm sugar, honey, or maple syrup to taste if you prefer sweeter treats. These would go very well with a cup or raw milk, or coffee, or tea.

The basic coconut flour shortbread is adapted from Eat the Cookie's version.

Grain Free Gluten Free Soul Cakes
Makes 12-18 cakes, depending on thickness

Ingredients (shortbread):
1 3/4 cups sifted coconut flour (If you don't have a sifter you can gently spoon/shake the flour into the measuring cup)
1/4 teaspoon baking soda
1/2 teaspoon sea salt
1 tablespoon apple cider vinegar
1/2 cup room temperature butter (for dairy-free you could sub coconut oil here, making a total of 3/4 c. coconut oil)
1/4 cup soft coconut oil
1/2 cup palm sugar (or other natural sweetener of choice; add more if you'd like your cakes sweeter)
3 eggs
2 teaspoons vanilla extract
1/4 cup sliced almonds
1 tablespoon cacao nibs

Note: You can adapt this with whatever trail mixy-items of dried fruit and nuts that you happen to have around.

Directions:
Preheat the oven to 350 degrees F. Using a spray olive oil (or softened butter or coconut oil), lightly grease silicone baking cups. (I used round silicone muffin cups, like the ones available here, and also the Wilton pumpkin / leaf silicone cups, available here.)

Combine the flour, the salt, and the baking soda thoroughly in one small bowl - if necessary, use your fingertips to crush any clumps of coconut flour. In a separate larger bowl, cream the butter, coconut oil, and palm sugar together - and then mix in the eggs one at a time, followed by the apple cider vinegar and the vanilla extract. Add the dry flour mix to the wet mix and combine thoroughly.

Press the dough into the greased silicone cups at desired thickness. Press a few slivers of almond and cacao nibs into the dough. Bake at 350 for 8-10 minutes.

Once you pull the cups out of the oven, warm:

1 tbsp. butter (you could sub coconut oil)
1 tbps. heavy cream (you could sub coconut cream concentrate)
1 standard size bag bittersweet chocolate chips (go for quality)

...for 2 minutes and half power in the microwave. (You can also melt everything in a double boiler, though that may take a while longer.) Mix the ingredients with a spoon until the chocolate melts into a smooth ganache, and spread the chocolate over the shortbread in the silicone cups. Press some dried cranberries into the ganache.

Allow the shortbread and chocolate to cool.

]

Gently push the silicone cups from the bottom to release the shortbreads from the cups. Put the shortbreads chocolate/cranberry-side down on a clean paper towel or wax paper.


If desired, use the melted bittersweet chocolate to also decorate the tops of the cakes. One of my little tricks for drawing in melted chocolate is to use a sanitized medicine dropper - I find it affords a lot more fine motor control than would a traditional frosting decor bag and screw-on tip.

Here, I drew a cross shape in the chocolate and added cranberries on the top of the round cakes. For the pumpkin and leaf cakes I traced the lines.


This post contains Amazon affiliate links. Shopping Amazon through Primal Kitchen affiliate links supports Primal Kitchen at no additional cost to you, so thank you!!

Wednesday, March 9, 2011

Strawberries with Mascarpone and Cacao Nibs

Om nom nom.

That is all. We now return you to your regularly scheduled programming. :)


P.S. - Doesn't everything look a little more special and taste a little more delicious when served in cut glass or crystal? I think so.


~

Monday, December 13, 2010

Menu Plan: A Chocolate / Coffee Abstention

I have some loooong overdue dental work coming up in a couple of weeks. Basically some bonds that had aged need to be replaced, but guess what? Once a bond is set in your mouth, it has a 5 year life, more or less. Whatever color the dentist chooses for your bond, therefore, is the brightest possible color that bond is destined to be for 5 years, because you cannot "tooth whiten" the composite used for bonds (as I understand it, the same composite used to make white fillings). Ironically, bonds can stain slowly with time (as with coffee, wine, etc.), but there's no simple way to whiten a bond short of replacing it. This means that if I whitened my teeth with one of those commercial kits sold at, say, Target, I'd have some whiter teeth - but the bonds would stay their original color and stick out like sore thumbs.

So, all that said, I took the opportunity and the offer from my dentist of a free tooth whitening before I get the new bonds installed. Do you know what this means? It means, for the next two weeks:
  • Nothing that stains teeth. No coffee, no red wine, no dark teas, no chocolate. While, amazingly, I have a hard time considering abstaining from these just for the fact that I maybe should not be having them every day - I have no problem with the idea of abstaining for a two week period while my teeth are being whitened. I am not going to mess up the 5 years that I'll be wearing these soon-to-be installed new bonds - and so am going for optimum results.
  • I have these custom-molded trays in my mouth for a minimum of 4-6 hours each evening (or overnight). So basically, as soon as my husband arrives home and we get the girls in bed, I'm wearing this fabulous-looking implement for the entire evening...for the next two weeks.
Ergo, my biggest vices (coffee with heavy creamer, and dark chocolate) are off the menu for two weeks, as is polite evening conversation with my husband. I know, I know: who has the bright idea to schedule this kind of scenario in the two weeks before Christmas? But truth was: it was the only time that it could happen - and it just may save me some carbs and calories, maybe even more this time of year than other times.

(This doesn't really affect my general menu plan for the week. It does, however, give you an idea if you've been trying to shake a chocolate bender for a while: set yourself up for some expensive long-term-implications dental work that involves a couple of weeks of tooth whitening prep.)

And, by the way: my oven is still kaput, at least for the next week. Crockpot and stovetop cooking are the name of the game.

Here's the menu plan for the week:

Monday:
Breakfast - Bananas, whole milk
Lunch - Eggs and bacon
Dinner - Crock pot tamari chicken thighs (Nature's Promise chicken drumsticks and thighs on sale at Giant this week)

Tuesday:
Breakfast - Stir-fried bok choy, mashed boiled eggs
Lunch - Intermittent fast, perhaps
Dinner - Crock pot garlic ginger pork loin (pork loin's on sale at Giant) with cabbage and leeks

Wednesday:
Breakfast - Banana cinnamon whole milk yoghurt smoothie (maybe with some whey protein in my case)
Lunch - Veggie soup with leftover pork loin, maybe seasoned with some star anise
Dinner - NY Strip (on sale at Giant this week), cut into pieces, marinated, stir-fried on the stovetop, topped with gorgonzola and tossed on a salad

Thursday:
Breakfast - Persimmons slow-cooked overnight in the crockpot, topped with autumn spices and Kerrygold and/or heavy cream (Persimmons are on sale at Giant this week!), prosciutto
Lunch - Scrambled eggs with gorgonzola
Dinner - Leftovers, whatever they may be

Friday:
Breakfast - Cheese, sliced apples and almond butter
Lunch - Curried pumpkin soup
Dinner - Maybe out somewhere, like a Chipotle steak salad bol, or a bunless Five Guys burger? In any case it will result in meat and veggies, most likely :)

Wednesday, September 22, 2010

Lunchbox #7


Today, my preschooler's lunch featured (clockwise):
  • Spinach salad with carrots and green peppers - tahini dressing on the side. To make the spinach more kid-friendly, I tear off the stems and break the leave into more bite-sized pieces
  • Red potato home fries (yes, our family still occasionally eats potatoes)
  • Bruschetta cheese - we got this at Sam's Club; so tasty!
  • Leftover baked chicken, drizzled with balsamic vinegar
  • A homemade primal peppermint patty (= a lot less sugar!)

Thursday, September 16, 2010

Lunchbox #5


Today, my preschooler's lunch featured (clockwise):
  • Organic whole milk yoghurt with frozen wild blueberries mixed in
  • 2 squares Green & Blacks 85%, 2 massive strawberries
  • Cherry tomatoes and baby carrots, with a mustard/sour cream dipping sauce
  • 3 miniquiches with bacon, cottage cheese, carrots, and zucchini

Saturday, August 21, 2010

Son of Grok's Strawberry Cheesecake with Joyful Abode's Chocolate Ganache

Happy Birthday to my mom! We celebrated over Son of Grok's strawberry cheesecake with Joyful Abode's chocolate ganache spread on top. To me, the cheesecake was just sweet enough; my nonprimal relatives proclaimed it "tart" - but in a good, European dessert kind of way - and they said that the sweet, dark chocolate ganache was the perfect balance. It might have been just a bit prettier had there been a springform pan on hand.

The only substitutions I had to make to the cheesecake mix were these: I had only one 8 oz. block of organic cream cheese, so I used 8 oz. of organic cottage cheese for the second cream cheese block called for by the recipe. The result was firm, creamy, very lightly sweet, and tart. I would happily eat by itself, but with the ganache it is a little more "intro to primal/paleo" friendly. I also added just a few of the semisweet chocolate chips to the melted butter/almond meal crust and mixed to melt/combine.

Thursday, August 19, 2010

Primal Peppermint Patties

Hot dog. And by "hot dog", I mean: PEPPERMINT PATTY!

I adapted this based on Joyful Abode's recipe. I didn't have coconut chips at my disposal, so here's my version, which is based on what I had handy. The next time I do these, I'll totally pour the mix into muffin cups or individual Dixie cups one at a time (in the picture above, I had poured to the top of the cup, and sliced after freezing).


Primal Peppermint Patties
Makes 10 large patties

Ingredients
1 banana
1 can of coconut milk's thick coconut cream, extra liquid poured off* and not mixed in
4 tablespoons melted coconut oil, to add to mix
2 teaspoons peppermint extract, or to taste
1 tablespoon honey
1 cup semisweet chocolate chips (the darker the better)
2 tablespoons coconut oil, to mix with chips
Sheet parchment paper or wax paper
10 wax-lined small Dixie cups

Directions
In blender, combine banana, coconut cream, melted coconut oil, and peppermint extract. Pour these about 1/4 inch deep into wax-lined small Dixie cups, and freeze at least 2 hours.

Once patty centers are frozen, melt coconut oil and chocolate chips in the microwave, and stir. Working quickly, remove the patties from the freezer and peel the cup away. Dip the frozen patties in the melted chocolate and lay out on parchment paper to cool. Store in fridge or freezer, and serve cool.

***
Funny side story: as I was trying to assemble these last night, I microwaved the chips, when the noise woke my 8-month old daughter. "Here," I said, handing the melted chocolate to my bewildered mom, who had no idea of what to do or where I was in the process. I slammed the parchment paper and knife on the counter, gave her a short scenario of my intentions, noting, "...when I get back up I'd just have to microwave it and wake her up all over again." She took the still-melty chocolate and made the patties for us all. And isn't the one above so pretty? Go, Mom!

*Incidentally, this poured-off coconut water-type stuff makes a great emulsifying base for some primal hot chocolate.

Friday, July 16, 2010

Antioxidant "Salad"

The huge, ripe blueberries this time of year taste like candy to me. Oh man, and knowing that in just a few weeks they won't be so abundant and so cheap? Makes me want to enjoy them all the more.


Toss half of a cup of blueberries with:

Drizzle macadamia oil
1 tbsp. (or more, to taste) balsamic vinegar
2 tbsp. cocoa powder
2 tbsp. cacao nibs
2 tbsp. chopped macadamia nuts

Mix oil, vinaigrette, and cocoa powder until smooth. Toss with blueberries until berries are coated, then top with cacao nibs and chopped macadamia nuts.

Somewhere between dessert and salad, but hitting sweet, plus salty, plus tangy, plus crunchy, plus juicy, plus antioxidants up to my eyeballs.

Wednesday, July 7, 2010

Custards!

Yes, eggs are an awesome staple to start your day. But say you're looking for something a little more fancy-pants. Indulgent, without being indulgent, you know what I mean? Enter the custard. I love making custard as a night-before project that has my breakfast ready-to-eat, no cooking, the next morning!

Preheat your oven to 350 F.

First, find a large rectangular pan and fill it with about an inch of water. This is the classic "water bath" method that is used in cheesecake recipes to enable an even baking throughout the custard.

Next, place some smallish Pyrex dishes (or other ramekin-type dishes) in the water bath. No need for them all to be the same size. You can see here that I used three small ones, a medium one, and three clean baby food jars. Why the baby food jars, you ask? I'm experimenting with them as a way to send custard with my three-year-old to preschool in the fall, when I'll be packing her lunch three days each week. (They turned out perfectly baked in these jars, by the way! I poured the excess off the full ones into the big Pyrex dish so that there would be about 1/2 inch to expand during the baking.)

OK. So you have your water bath pan, filled with your little custard dishes. Get yourself a nice, easy, primal custard recipe. You can experiment with it after you're used to the process. I like the Son of Grok banana "Caveman Custard" recipe. In my head, I call it "1-2-3 custard" because it requires one can of coconut milk, two bananas, and three eggs (along with a dash of cinnamon). Whip up your custard batter, and pour it into your ramekins. (I did nearly-full baby food jars, and about 1/2 inch deep in the larger dishes.)


Stick it in the oven and bake for 45 minutes at 350. Take them out of the oven, but don't remove them from the water bath. The more gradual the cooling process, the prettier your custards - that is, the less likely they are to crack on top. Once the water bath is completely cool, put the custards in the fridge to cool and set some more overnight.

Oh, and remember the part about experimenting? Now that you've done your basic custard recipe, shake things up.

Add a drizzle of walnut oil to the custard batter for some added fat, and a deliciously nutty taste. (Just don't do it all the time, though, since walnut oil is omega-6 heavy. Maybe make the custard with Omega-3 eggs to offset?)

Mmmmm, walnut oil in a pretty tin.

Other variations: You can soft cook some rhubarb and very ripe cherries (must be ripe to offset the rhubarb's tart), and then temper your eggs with them before adding the eggs and a stick of butter. (No coconut milk this time.) This results in a very Yoplait Whips! type texture.

While you're experimenting, add nutmeg, ginger, vanilla, etc. to your liking as well.

Oh, and let's talk toppings. In the morning, I top my chilled custards.

See my humble banana custard? (And yes, even with gradual cooling, there's a little crack. So sue me. This is another good reason to talk toppings - because they hide cracks!)

Add some fresh blueberries, a small handful of cacao nibs, and a few walnuts. Now we're talking indulgent breakfasts.


Tuesday, July 6, 2010

Movie Theater Snacks


This week my girls and I met up with a dear friend and her 3-year-old son - both of whom we don't get to see entirely enough! We went to see a free showing of a kids' movie at a local theater. Of course, I immediately realized that this would involve sitting in a sea of candy, popcorn, sugary soda, etc. Not wanting to be a complete Scrooge and force my daughter so sit through all that munching with nothing of her own, I strategized in advance and came with a bag of trail mix in my diaper bag. (As if there was a remote possibility of movie theater concessions having Primal snacks!) In it was:
  • Almonds
  • Walnuts
  • Cacao Nibs
  • Freeze-dried bananas (Brothers brand)
  • Dried organic apples (Just Tomatos brand)
  • Dried organic raspberries (Just Tomatos brand)
I know that Mark Sisson says to watch out for the sugar content of dried fruits, so this was truly what I'd consider to be a "special outing" snack. Besides, it was just too addictively good for me to make often. :)
Related Posts Plugin for WordPress, Blogger...