Showing posts with label kid-friendly. Show all posts

Monday, July 15, 2013

Road Trip Paleo Finger Food: Prosciutto-Wrapped Sugar Snap Peas


This is my new favorite finger food, snack food, lunch food, whatever! They would make an especially great summertime hors d'ouevre, because of the portability, snackability, and the way the cold, sweet, crunchy snap peas are enveloped by a layer of salty porky prosciutto goodness. I will definitely be making these for our upcoming road trip; talk about an easy low carb snack food that we all enjoy!

My two young daughters are also keen on these; the whole plate of snap peas was cleaned out about 5 minuter after I photographed them. It is a great dish for kid-friendly assembly, so have your little ones join in the fun of wrapping the snap peas! Don't worry about perfection - you can wrap the peas with a little or a lot of prosciutto, and you can even wrap more than one snap pea in a little bundle!

Prosciutto-Wrapped Sugar Snap Peas
Makes up to 96

Ingredients:
At least 96 sugar snap peas
1 lb. (32 thin slices) of prosciutto

Tear 1/3 off of a slice of prosciutto, and wrap it around a single snap pea. The prosciutto will "seal" on itself if these are wrapped snugly. Refrigerate until ready to serve.

~


Saturday, February 23, 2013

Star Fruit Magic Wands


This is a fun little project I dreamed up for my daughter's upcoming 6th birthday party. It is fast, pretty, and best of all, kids love the magic wand effect. What can I say? Kids love edible things that look like non-edible things.

Here's the scoop.

Star Fruit Magic Wands
Makes 6-8 magic wands

Ingredients
2 large star fruits

Tools
6-8 6" bamboo skewers, ideally the kind with one pointy end and one blunt end

Directions
Wash the star fruits, then slice into 3/4" thick slices. (You will have a couple of end pieces that don't work as well...so snack away on those!)

Insert the pointy end of the skewer into the bottom part of the star on the star fruit slice, about 1" deep.

Serve immediately, or for a colder popsicle-style treat, let the star fruit magic wands chill in the freezer for 20 minutes.

For a serving suggestion, consider a stout vase or two filled with glass pebbles or marbles, to hold the wands in place so that the magic wand star design really stands out!


~

What simple kids' birthday party ideas have you been trying out lately?

Friday, January 25, 2013

DIY BBQ-Flavor Kale Chips - Gluten Free, Grain Free, Dairy Free, Paleo, Primal


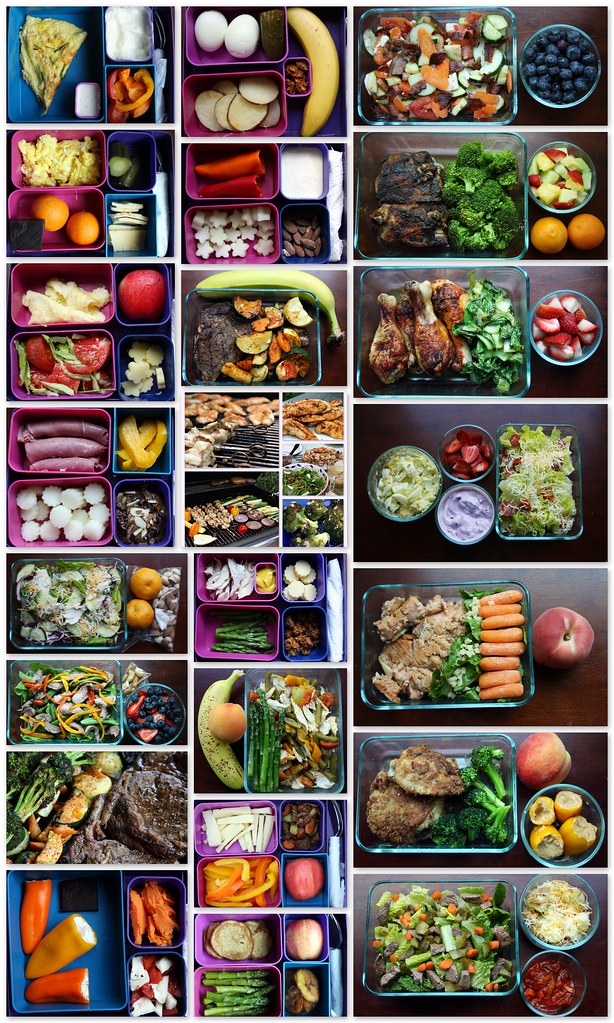
True confessions time: I have been having a really hard time with this nutrition challenge. You'd think a challenge vet like myself would not have difficulties with a challenge - I've done 3 on my own and this challenge makes the 5th with my Crossfit box. And it is true - the more challenges I've done, the better I've gotten with economies of scale, sourcing my food, planning ahead, and honing the recipes that really work for me and my family.

For me, this time the difficulty is boiling down to a) motivation - it is so hard to keep it going when I am not able to work out the same way that I did in past challenges (due to rehabbing an injury), and b) boredom/monotony, because I haven't been proactive about mixing it up with different foods, instead falling back frequently on my usual stand-by recipes. Also, during this challenge I am trying something new and combining the J.J. Virgin recommendations with the paleo challenge portion, so I am not eating eggs, which has proven far more difficult than I'd have guessed - eggs are my breakfast go-to, after all!

The monotony thing has really gotten to me, because even a good 12 days into the challenge, I am finding myself drawn to taste-bud-hijacking junk foods (sweet and salty both) and prepaleo comfort foods. I have managed to not slip up, but these cravings tell me that I need to get some new challenge-legal snacks in my life!

Speaking of challenge-legal snacks, I'm already thinking ahead to a classic comfort food occasion: the Super Bowl. I don't even care about football, but boy, do I love football-watching food. We are hosting some friends, and I'm planning ahead this year to have challenge-friendly fare at the ready: Some slow-cooked shredded carnitas in a crock-pot, maybe some hot wings (if it's not too cold for grilling), veggies and guacamole, Clementines, and so on. Perhaps I will also make kale chips! After all, nothing says, game food like something crispy and savory.

Today, I tried out my first go at kale chips - I've had them store-bought before from the company Brad's, which does a marvelous job - but I was hoping to get similar results at home for a fraction of the price. The cashew butter combined with the apple cider vinegar and seasonings lends a rich umami "cheesy" flavor, to these, as well. This is what resulted, and my daughters and I enjoyed the chips so much that I couldn't resist sharing!

Barbecue Flavor Kale Chips
Makes about 2 cups of chips

Ingredients

  • Bunch of fresh kale, about the size of two fists, with stems removed and chopped into roughly chip-sized pieces
  • 2 tablespoons cashew butter (can sub nut butter of choice, or tahini, or sunbutter - though I don't recommend the final toasting at 450 with these due to oxidation concerns)
  • 1 tablespoon bacon fat
  • 1 tablespoon oil of choice (I used macadamia oil, which has a higher smoke point)
  • 2 tsp. apple cider vinegar (raw organic apple cider vinegar is usually cheapest found in stores, around $3/bottle)
  • 4 drops organic stevia extract (optional, adds to the BBQ flavor, could also sub honey or maple syrup depending on your goals)
  • 1/2 tsp garlic powder
  • 2 tsp. onion powder
  • 2 tsp. paprika
  • 4 drops fish sauce (optional; I used Red Boat, which is free of junk - made of just anchovies and salt)
  • Sea salt to taste (I used 30 cranks from my sea salt grinder)

Directions


After washing the kale pieces, use a paper towel to get as much moisture as possible off of the kale. Put the kale pieces in a gallon-sized Ziploc bag.

In a blender or mini food processor, blend the remaining ingredients until smooth. Mixture will be thick unless bacon fat was already warm/liquid.

Spoon the blended seasoning mix into the Ziploc bag with the kale pieces. Close the bag and "massage" it for a couple of minutes to get the seasoning mix into as many crannies of the kale as possible. The mix will warm just a bit from the massage action and probably become a little less thick, so this will help your task.

Spread the kale chips in a cake pan or cookie sheet, and bake at 350 for 30 minutes, gently stirring the chips around the pan every 10 minutes or so. The kale will get a little limp before it starts to dry and crisp up during this process. Finish the chips with 1 minute of the broiler set on 425 just crisp the chips just a little more. Enjoy hot, fresh, and crispy, straight out of the oven!


This post contains Amazon affiliate links. Shopping Amazon through Primal Kitchen affiliate links supports Primal Kitchen at no additional cost to you, so thank you!!

Thursday, December 20, 2012

Paleo (-"ish") Cookie Exchanging, And A Sun Butter Buckeye Bon BonRecipe

This is what I call a cookie group hug.
Heh heh. Nut sack. :)

Our Crossfit box's cookie exchange was today! We did things "paleo-ish" - gluten free and no canola oil or soybean oil. I was blown away by how many signed up to participate.

We had a great turn out, and so many different kinds of cookies - almond biscotti, no-bakes, pistachio-cranberry bark, chocolate chip, eggless egg-nog, samoas, soft ginger, and many more. One creative lady brought decorative favor bags filled with nuts as her contribution!

We gathered around and sorted cookies into boxes - some kind souls brought in some mimosas for the volunteers. Within about half an hour we had the boxes mostly packed and ready. 

I'm so grateful - even though I'm my December sugar detox has tapered off and my youngest can't eat refined sugars, my husband and oldest daughter will get to share some daddy-daughter dates over hot chocolate and some wholesome treats as Christmas draws near.
Noms!
I mean, will you look at those beautiful paleo samoas?! My friend used the Real Sustenance samoa recipe.
And of course, always nice to have classic (paleo) chocolate chip cookies around.
Sun butter buckeyes. Legume-free, gluten-free, dairy-free, egg-free.
My contribution to the exchange was sun butter buckeyes. I saw a recipe for peanut butter buckeyes here and adapted it with sun butter and also made it dairy-free. I subbed coconut oil for the vegetable oil. I also halved the powdered sugar with no noticeable detriment to the taste.

Sunbutter Buckeye Bon Bons
Makes approximately 5 dozen

2 cups sun butter (mine for this came in bulk sweetened with sugar but you can order organic unsweetened, too)
½ cup palm shortening
1 teaspoon vanilla
3 cups crispy rice cereal (I used Erewhon organic cocoa; 1 box is 6 cups so this recipe uses half a box)
2 cups powdered sugar
Semi-sweet chocolate chips (I used Enjoy Life allergen-friendly chocolate chips)
1 tablespoon coconut oil

Warm the palm shortening on the stove or microwave until soft. Mix with Sunbutter and vanilla in a bowl with a mixer until blended through. Add rice cereal and powdered sugar, and continue to mix until thoroughly blended.

Using a teaspoon, measure out balls of the sunbutter "dough" onto wax paper on a cookie sheet or cake pan. Freeze thoroughly - at least an hour. You will probably need a lot of free freezer space for 5 dozen of these.

Melt the coconut oil and chocolate chips in the microwave and stir until smooth.Take the frozen balls out of the freezer about a dozen at a time. Using a slotted spoon, lower a frozen sunbutter ball into the melted chocolate and drop it back on wax paper. Every dozen that you finish dipping, place them back in the freezer to set some more (another 30 minutes).

Store in the freezer in an airtight container (for up to several weeks) or in the fridge if you are consuming soon.


What more wholesome treats did you bake up this year?

This post contains Amazon affiliate links. Shopping Amazon through Primal Kitchen affiliate links supports Primal Kitchen at no additional cost to you, so thank you!!

Tuesday, December 11, 2012

Safer Gifts in 2012: Gluten Free and Non-Wheat-Based Modeling Dough Edition

Our family has been experimenting in 2012 with toys and art projects that are safer for my youngest daughter, who must be strictly gluten free.

Play-Dough is a ubiquitous childhood memory. I have fond recollections of squishing and manipulating Play-Dough, and modelling various little masterpieces before letting them air dry.

Unfortunately, Play-Dough and most commercial modeling doughs are made with wheat flour, so rubbing these products all over our family's kitchen table is not an option, as it presents a pretty high risk of cross contamination for the same place where we eat most of our meals.

Thankfully, there are a lot of good, safer alternatives that would make excellent gifts for almost any kid.*

So far, my top pick for a gluten free dough alternative is Mama-K's gluten free play clay. This stuff is in a class of its own for quality and design. We picked up the 5 tub variety pack of this in the summer, and the 5 different colors in modestly sized tubs turned out to be a convenient way to leave a few with my youngest daughter's preschool classroom, so that she can model with this if there is a Play-Dough project going on.

Each of the 5 colors has its own fragrance from organic essential oils: bergamot (yellow), lavender (purple), sweet orange (an orangey-red), geranium (pink), and lemongrass (green). My husband and I get headaches from artificial scents, but these natural scents are low-key and not overpowering to me - quite to the contrary, I enjoy them. Also, the flours used to make Mama-K's are certified gluten free, so of the options we've tried, this one seems to have the most stringent standards for its doughs' processing and ingredients.

See above, right, the screenshot from the Crayola website. Cross contamination seems to still present a very small, but relevant risk. Please choose only modeling doughs that meet your family's safety and dietary/allergen requirements, with the advice of your trusted health care professional.
The other non-wheat-based modeling alternatives we've been able to try out this year are by Crayola, and include Model Magic and Air-Dry Clay. While their ingredients aren't as natural/crunchy as those in Mama-K's dough, the Crayola doughs are still a good option for any air-dry project, or a project that you'd like to paint and customize after drying - homemade Christmas ornaments certainly come to mind. The Model Magic and another brand's take on Model Magic have popped up at my daughter's occupational therapists' office and at her mainstream preschool. On a practical note, I suggest opting for the white (uncolored) version of the Model Magic over the colored version, since I have seen our youngest daughter's occupational therapist use a Crayola marker to "dot" a wad of the Model Magic a few times and massage it, thus changing the white wad of dough into the marker's color. You could also experiment with natural liquid or powder dyes if magic markers are not an option, or wait until the white dough drys sufficiently before you paint your projects.

Have you tried a gluten-free modeling dough this year? What was your favorite?

*Note that according to the Crayola website, there is a small risk of cross contamination from the Crayola plant using the same processing lines as it uses for its wheat-flour-based dough - though the lines are cleaned between processing products. (See Crayola website screenshot above.) If your child is at risk from this potential level of cross contamination (i.e., putting his/her fingers in her mouth while modeling, or eating the Crayola dough, or working on a surface with the dough on which he/she regularly eats meals, etc.), you will need to decide for yourself with the advice of your trusted health care professional whether the products in this post meet your family's individual needs or not. Remember to read ingredient labels fully for your family's own needs. All posts and information provided within this blog are for informational and educational purposes only, and is not to be construed as medical advice or instruction. No action should be taken solely on the contents of this website.  

This post contains Amazon affiliate links. Shopping Amazon through Primal Kitchen affiliate links supports Primal Kitchen at no additional cost to you, so thank you!!

Thursday, November 15, 2012

The Notion of Different Parenting/Food Philosophies for Different Kids

I always thought I'd be able to apply the same nutrition principles and food philosophy with all of the kids I'd have.

Until lately.

Lately, I've been mulling where to give wiggle room. For my 2 year old, there is none. She has sensory processing disorder and speech/developmental delay, and is on a gluten free dairy free gut-healing diet.

But my 5 year old kindergartner? She is now coming up on halfway through her school year.  I've come to grudgingly admit that my glory days of packing her uncompromising real food lunches for preschool have to be adapted into a more self-aware social context. She's already reported to me that cafeteria tablemates have made fun of her Wholly Guacamole 100 calorie packs, teasing her by saying they look gross.

(Side note: Parents, can we all agree to train our kids to never make fun of other kids' lunches? I know it's hard to do, but it's worthwhile. Thanks very much.)

I've tried to continue the angle of her holding her own, saying that she should joke around with them that it's like she's eating slime, ewwwwwwwwww. Deviled eggs - seemed pretty innocuous to me - are also being reviled.

It's never been my goal for my kids to feel stifled by our dietary approach. I want my daughters to learn in concrete terms why we chose the foods that we do. I also try not to condemn foods wholesale, but to refer to foods as being along a spectrum in terms of healthfulness, and asking about what healthier choices might exist.

That said, lately I've given my 5 year old more of an 80/20 approach. Since she eats lunches away from her sister during the school day, she might get a handful of 6 or 7 gluten free pretzels in her lunch once a week, or once in a great while a tetrapack single serving of chocolate almond milk. I even had a day a couple of weeks ago when I packed her a slice of Chebe pizza leftover from a weekend gathering with grandparents -- and it so happened that pizza was on the menu in the lunchroom. I think these minor concessions go a long way to helping her to feel more like her friends without compromising too much.

How to you work the 80/20 angle for your kids' lunches? Do you have a household where different food standards apply among your kids based on their individual physiological and social/emotional needs?

Tuesday, November 13, 2012

Mainstream Pediatrics Addresses Gut Health in Autism Spectrum Children

This last weekend, a friend who is an occupational therapist alerted me to this: "Gastrointestinal Conditions in Children With Autism Spectrum Disorder: Developing a Research Agenda". It was an article hot off the presses in the November 2012 issue of the American Academy of Pediatrics' monthly magazine Pediatrics.

In short, this article represents America's pediatricians coming to a consensus about deteriorated gut health and autism spectrum disorders being linked and real. The article even uses "gut-brain connection" and "leaky gut" - terms that in years past were relegated to the category of desperate parents' and quacks' "crazy talk".

The article's information and content were not new to me...I've been independently exploring and applying those research concepts for well over a year on behalf of my youngest daughter, who has sensory processing disorder and speech delay.

Here, then, is the significance: This magazine serves as mainstream pediatrics' voice.
Addressing gut health in autism spectrum disorder kids has now been prioritized. Consequently, any parent who asks their pediatrician questions about their ASD kids' diet should not be brushed off or dismissed, but instead earnestly, constructively engaged. While our own family doctor has been very supportive of our efforts to maintain my daughter's diet, I frequently come into contact with other parents whose doctors' reactions to suggested diet changes range from indifference to condemnation. Often, due to limitations in geographic availability or insurance coverage, such doctors remain the only option for these families. Now, though, the parents can discuss with their children's doctors the options for dietary changes with the American Academy of Pediatrics' backing.

I felt tears well a bit in my eyes when I read this article. It is a major breakthrough for parents who are trying to support their children's neurodevelopmental progress through a cleaned-up diet. I encourage you to print out this article and give it to your loved ones who are parents of children with neurodevelopmental disorders - because as many of us will testify, change in diet is the foundation to the rest of the therapies and progress these kids can hope to tackle.

Thursday, October 11, 2012

Boo Bites (Paleo / GAPS Diet Halloween Treats)

Boo!
These little guys came to me in a moment of inspiration. I was already mixing up a batch of coconut manna and honey, with a pinch of sea salt. My copy of the GAPS book suggests that patients with blood sugar regulation issues might benefit from taking a combo of coconut oil and honey between meals, and I think that in my youngest daughter's case, having this combo around every other day or so has helped to keep her calories up and her blood sugar from crashing.

I was mixing the stuff up when I thought to myself how like playdough its consistency was. All of a sudden I knew what I could do; I rolled the "dough" into little balls, flattened the balls, and then pinched out little wispy ghost feet. Two miniature allergen-friendly chocolate chips for eyes and a raisin for a mouth going, "OoooOooooo!" and my Boo Bites were born. My 5 year old gets a huge kick out of these and likes to make ghost noises when she is talking about them. While I think they would be cute in lunches, they do require a certain amount of cold, so it would have to be in a lunchbox containing an ice pack, or one kept in the fridge.

This is a great, safe kitchen project for kids to help! The ghosts don't have to look perfect, and the decoration of the eyes and mouths will definitely keep your little ones busy.

While GAPS keeps sugar absolutely out of the diet (and thus mini chocolate chips with sugar are a no-go), you could easily cut a raisin into two smaller pieces for the eyes, making the treat consist of coconut manna, honey, sea salt, raisins, and if desired, GAPS-legal vanilla. Presto! Totally GAPS compliant. Another option for the eyes could be a couple of unsweetened cacao nibs.

Boo Bites
Makes 6

Ingredients
  • 1/2 cup coconut manna, slightly warm and soft*
  • 3-4 tablespoons honey (adjust to your sweetness preference, buy locally or find a good quality one online)
  • Pinch sea salt
  • 1/2 tsp. vanilla extract (Rodelle is one gluten free, junk free option)
  • Raisins, for decoration
  • Mini chocolate chips, appropriate to your dietary needs (I like the allergen-free Enjoy Life chips)
  • A tray or dish lined with parchment paper or wax paper, the right size to fit into your freezer

*One way to soften your coconut manna is to put about 1" of hot water in a larger bowl, and then place a smaller bowl containing the coconut manna into the larger bowl, double-boiler style. After about 10 minutes the coconut manna should be nicely malleable. Remember that coconut manna consistency varies from brand to brand and even jar to jar - you are going for a play-doh style consistency, so if it seems too runny, add more manna. Not runny enough? A little more honey, or even a little added coconut oil.

Directions

Stir together all ingredients except for the raisins and chocolate chips. See above notes on consistency; once you have achieved a nice doughy consistency, roll a chunk of mix into the size of a large marble. Flatten the ball, and then use your fingertips to "pinch out" some ghost feet. Place the ghost on the parchment paper. Repeat with the rest of the coconut "dough" until all the ghosts are made. Decorate the ghosts with the chocolate chips for eyes and the raisins for mouths. Place the dish into the freezer to allow them to set. Serve chilled.


This post is participating in Stacy and Matt's annual Paleo Parents Halloween Recipe Roundup.

This post contains Amazon affiliate links. Shopping Amazon through Primal Kitchen affiliate links supports Primal Kitchen at no additional cost to you, so thank you!!

Monday, September 17, 2012

Operation "Smuggle Cod Liver Oil", aka the Supplement Smoothie

I've tried a lot of different methods to smuggle certain vitamins to my kids over the last couple of years. This year has become an even more interesting gambit because there are certain supplements I've been advised to give my two year old with sensory processing disorder. How do you get a young, sensory kid with oral motor and language delay issues to down different forms of necessary (and sometimes not-that-tasty) supplements?

A smart girl makes the most of a banana.
(Via the the U.S. National Archives on Flickr.)
My current answer is: a banana smoothie. After going through the initial stages of the GAPS diet, very ripe (brown-spotted) bananas are permitted. My sensory two year old doesn't get as much fruit as she did pre-GAPS. This means that she's especially eager to have some of that banana smoothie, because it tastes extra sweet to her these days. I use that one banana's worth of smoothie to my full advantage to smuggle in her supplements - and a nice feature is that a thoroughly blended ripe banana's thick liquid texture accommodates drops, powders, and capsule contents alike.

Most of the time, I use a minichopper to make the smoothie. It's so much easier to pop the chopper's cup and blade off into the dishwasher after making the smoothie - much less work than dealing with a blender or my full sized food processor. Another option I've used for the smoothie is an immersion blender, which works well as long as the banana is very ripe. I simply blend a very ripe banana until it's a thick liquid, and then add the supplements and blend a bit again.

Fortunately, sucking thick liquids through a straw is one of many oral motor exercises that our speech therapists and occupational therapist have recommended for my two year old, so I get to kill multiple birds with one stone when she's slugging down her smoothie.

For omega-3 essential fatty acids, I use Carlson's cod liver oil for kids in Lightly Lemon flavor (which I order on Vitacost.com) - I've found that the lemon and the banana flavors combine very well with no discernable fishy aftertaste. A high quality fish oil that's been tested for negative with heavy metal contamination is critical for us, since my sensory girl doesn't eat that much fish because of concerns about heavy metals and her body's limited ability (if any) to deal with them appropriately. That said, we give Carlson's to my neurotypical 5.5 year old as well, because quality omega-3s are almost always a good addition to one's diet. There are a few really good quality fish oils out there, many with flavored options. I think a cinnamon flavor fish oil might also combine pretty well with blended ripe banana, but I haven't tried that combo yet myself.

Other things I've been known to smuggle into the banana smoothies include Vitamin D3 drops (a great idea anyway for kids who may not get enough sunshine), Vitamin K2 drops (as I've mentioned, a decent addition for those avoiding dairy), and some trace minerals that are especially critical for kids with neurological issues, such as magnesium, iodine, and selenium. Of course, in tandem with giving these supplements are our efforts to improve our daughter's gut health with the GAPS diet, in order for her digestive tract to regain its ability to appropriately absorb and process these nutrients in the first place! While I think it's ideal to get as much of these micronutrients from their original food sources as possible, in the case of a kiddo playing developmental catchup, making sure that these bases are covered is that much more important, which is why I'm grateful that most mornings, a banana smoothie usually gets enthusiastically gulped down.

How do you ensure that your kids get their supplements down the hatch? Do you have any tricks for them (or for you!)?

~

This blog post is an explanation of personal experiences for entertainment purposes only, and is not to be misconstrued as medical advice. Please consult your trusted primary care physician with any questions about major changes in your diet and your family's diet, and remember that decisions about your diet and your family's diet are your own to make based on your own health and circumstances. 

This post contains affiliate links for Amazon and Vitacost. Shopping Amazon and Vitacost through Primal Kitchen affiliate links supports Primal Kitchen at no additional cost to you, so thank you!!

Monday, September 3, 2012

Basic Savory Gluten-Free Dairy-Free Paleo Ranch Dressing / Dip

Dips "sell" packed lunches - especially for kids. Strips of leftover steak or baby carrots become that much more compelling when there's a savory dip around.

Since my two and a half year old has been dairy free for a few months - and by extension, so have I as the nursing mother - I've had to become a lot more diligent in learning to make classically paleo dips and dressings. My old stand-by was mixing full fat sour cream with seasonings. Now, though, I've been making a lot of practice batches of dips and dressings using a good old fashioned paleo mayo base. Credit goes to Melissa Joulwan of The Clothes Make the Girl for introducing me to the world of making one's own mayo - her recipe is a great one, and she has some links to delicious-looking tuna salads to make with it!

I've learned, too, that spending just 15 minutes to make a batch of homemade dressing or dip can yield a week's worth of dip - for the price of 1 egg and 1 cup of a healthy oil of choice, plus seasonings. The versatility comes when you experiment with added paleo condiments and seasonings to alter the taste profile and consistency of your basic mayo base.

This edition is a basic ranch dressing. The beauty is that it is very easily adaptable - you can remove the vinegar to keep it thick and ultra-dippy (like sour cream), or keep the chili powder and hot sauce out if you're serving it to someone who is averse to spiciness (though this recipe is hardly spicy...perhaps better described as "zesty"). The flavor of the dressing deepens overnight in the fridge, so keep that in mind as you add your seasonings - a batch that tastes just a little underseasoned while you're making it may be just right by tomorrow morning.

I've tried to base this recipe in ingredients that nearly anyone has in their kitchen at any time, but there are plenty of less common extra possibilities for fun additions to mix up the flavor, like fish sauce (for savory), curry paste (for tasty heat), or tamari and/or coconut aminos (more savory). As always, carefully read your ingredient lists on your condiments and seasonings to make sure that they fit your dietary requirements.

Basic Savory Ranch Dressing
Makes 1.5 cups

Ingredients
  • 1 egg (room temperature, so that it emulsifies properly - use the best quality eggs you can source for your money)
  • 1 cup oil of choice  - some good neutral taste choices are avocado oil, macadamia oil, a good quality light tasting olive oil (avoid oil blends with canola or soy added), or (less neutral) slightly warm just-melted coconut oil - either way the oil should also be very close to room temperature
  • 2 tsp. dried dill
  • 1 tsp. garlic powder
  • 1 tsp. onion powder
  • 1/2 tsp. sea salt
  • 1/4 tsp. chili powder
  • 1/4 tsp. pepper (I used ground white)
  • 2 tbsp. vinegar of choice (read ingredient labels; raw organic apple cider vinegar is a great choice)
  • 1.5 tsp. Tabasco or paleo-friendly hot sauce of choice
  • 1 tsp. raw honey
  • 1 tsp. plain yellow mustard (read your ingredient labels!)
Also, you will need a clean glass jar with lid that can hold at least 12 ounces.

Directions

First, you will make the mayo base.*

Crack open your room temperature egg into the bowl and turn your appliance onto medium speed - enough to whip the egg. Once the egg is uniform, turn the appliance onto high speed and very slowly drizzle your oil into the bowl. If you're doing it the right way, it will take a few minutes to drizzle your cup of oil into your bowl - using a narrow necked bottle or pitcher may make it even easier to keep your drizzle steady and slow.

Once you have achieved a nice, thick mayo base, add in your condiments and seasonings with your appliance at medium speed. If you want to be conservative, add a little of each at a time to suit your tastes. Chili powder and Tabasco should be added last, since they have the most potential to amp up the zestiness of the flavor profile. Some kids (and grownups) like zesty; some don't. Customize yours!

Store in an airtight glass jar in the fridge and consume within a few days.

~

*There are four kitchen appliance options to consider when making your mayo base. You can use:
  • One hand to hold a mixer while the other drizzles oil (tiring, very! I've done it), or 
  • A hearty blender, or 
  • A stand mixer, or 
  • A food processor with a lid that has a top with an opening.
In my experience, the stand mixer is the easiest option, but my food processor is a close second for ease and produces the thickest mayo base because it whips at even higher speeds than my stand mixer. Either way, your appliance will need to be prepared to run on full speed for at least 5 minutes...sometimes closer to 10, so chose one that is up to your task.

~


This post contains Amazon affiliate links. Shopping Amazon through Primal Kitchen affiliate links supports Primal Kitchen at no additional cost to you, so thank you!!

Sunday, June 17, 2012

Gluten Free Dairy Free Egg Free Peanut Butter Pie Chocolate Cupcakes


My husband is basically a big kid at heart. When there were rumblings about him wanting a peanut buttery dessert, I thought, who am I to stand in the way of birthday boy's desires? Peanut butter shows up rarely at our house - I usually go with sunbutter instead (a fabulous stand-in, by the way, tastes very, very similar to peanut butter).

Though I frequently use Primal Palate's dark chocolate coconut cake in our celebrations, this is also a gluten free recipe that works really well for cupcakes - we did the same cupcake recipe for my oldest's birthday party earlier this spring. I've noticed that for my oldest daughter, often the big draw of grocery store creations is the bright colors and characters. Though I no longer use the artificially colored frostings that show up on these kinds of birthday cakes and cupcakes, that doesn't stop me from using colorful decorations to punch up the visual excitement factor on an otherwise neutral hued peanut butter chocolate cupcake.

In no way would I consider these cupcakes paleo or especially nutritious - just a very rare gluten free dairy free egg free treat that our whole family (extended nonpaleo family included) thoroughly enjoyed. I originally got the cake recipe from an egg free gluten free mama friend after tasting it at her daughter's party! (This one is my adaptation of the original, shared here with her permission - thanks mucho, A!)

You could make this version below that much more allergen friendly by switching around to another nutbutter or seed butter of your choice, depending on your guests' food allergies or sensitivities.

Wacky Chocolate Cake


Ingredients:


Instructions:

Preheat oven to 350 degrees F.

Put all dry ingredients in mixing bowl and blend them well, then add oil, vinegar, vanilla and water.

Beat well with mixer until smooth.

Stir in chocolate chips until evenly distributed.

  • For 8" round cake: Pour batter into 8" greased pan (square or round).
    Bake 35-40 minutes.
    (You can double the recipe to make an 8" round layer cake.)
  • For a bundt pan: double recipe and bake 45-60 min.
  • For cupcakes: Makes one dozen, depending how full they are. Bake at 350 for about 25-30 minutes. If desired, you can fill your cupcake cups halfway, add  ½ tsp. of your peanut butter, and then top with the other half of your batter. That leaves a little peanut buttery bite in the middle.


Peanut Butter Frosting
Can sub sunbutter or nut butter of choice


Ingredients:

1 ½ cups smooth peanut butter, room temperature (if you can, try this with trans fat free natural/organic peanut butter)
½ palm shortening, room temperature
1/4 cup coconut nectar
1/3 cup powdered sugar

Blend all ingredients thoroughly.

Peanut Butter Pie Bonus Decoration: I picked up a 2 pack of Justin's dairy free gluten free organic dark chocolate peanut butter cups and sliced each of the two cups into six little pie-shaped pieces to use as decorative "peanut butter pie" toppers.

What are birthday cakes looking like at your house lately? How are you tinkering with recipes to make them allergen friendly?


~


This post participates in the Life As Mom Creative Birthday Cake Round-Up. Head over there to check out more fun decorating ideas, like the DIY Angry Birds cake! This post is also participating in the Daily Dietribe's Gluten Free Birthday Cake Roundup.

Wednesday, April 4, 2012

Why I "Do" Treats in Lunchboxes

A mother of my daughter's classmate said to me the other day, "My son says that [your daughter] brings lunches that are healthy, and with a piece of chocolate."

Heh...and with a piece of chocolate.

There are a lot of viewpoints on how to approach paleo treats, and those viewpoints become even more splintered and diverse when you're talking about the issue of approaching treats/cheats with kids. If you've followed my lunchbox series for any length of time, you've noticed that I somewhat regularly include for my daughter something that qualifies as a treat/cheat. It could be some dark chocolate chips in a trail mix, or a piece of dark chocolate by itself, or a macaroon, or some other home-baked treat.

Some purists might protest that I'm setting my daughter up to see treats as normal, as an obligatory element in a lunch. I see their point, but often the biggest counterpoint to this argument is the fact that my daughter eats lunch at preschool with her peers, whose lunches regularly include at least some prepackaged brightly colored sweet treat.

So here is my dilemma: do I then craft lunches without any treats at all? I feel like dying on the hill of making my daughter nutritionally-fulfilling-only lunches in the name of a "treats are not a regular part of life" philosophy would have me winning a battle...only to lose a war in the long run with her seeking out treats and sweets in excess because she somehow feels deprived by comparison with her peers.

Between home and social/educational exposure, my daughter's regularly exposed to two approaches to food: {paleo + whole food treats} and {standard American diet}. She's already old enough to know which one her tastebuds and her eyes prefer. She also is old enough to compare and contrast - I've been asked by her on several occasions about why she doesn't get certain prepackaged processed items. So, I hope that sending modest treats from home in her lunchbox serves as an innoculation of a sort, a way to show her that treats can still be a part of life in the right amount, when made with wholesome ingredients.

How do you approach feeding your kids treats in a whole foods context?


~

Saturday, February 4, 2012

Getting Your Family's Buy-In for Real Food Lunchboxes

For many of us who've resolved to do better with our eating this new year, the biggest obstacle to conquering that resolution is making packed lunches that we and our loved ones look forward to eating. This is especially true if you have a spouse or kids who are determined that lunchtime means a trip for some fast food, or a sandwich, or a slice of pizza from the cafeteria. Here's a few suggestions on dodging those pitfalls:

  • Don't be afraid to compromise sensibly, especially in the name of initial buy-in - doing this gracefully can help you to dodge protests. Learn the art of the meatza. Make some paleo bread for a die-hard sandwich fan. Find some good quality coconut wraps to make a wrap. That said, be sure to mingle your compromises with some classically paleo meals over the course of the week, which brings me to the next idea.

  • Try to do mostly "meat and veggies" lunches each week. A lunch that is predominantly high quality animal protein, with some veggies included and some healthy fat, is the kind of lunch that will satiate and keep you and your loved ones humming on even blood sugar for the whole afternoon. Remember, protein keeps you awake, sugars make you sleepy. Lots of wonderful, nourishing paleo foods are nonetheless higher in carbohydrates, so keep the lunchtime carbs low to moderate (unless you've just worked out or are just about to work out and your muscles could use them right away!). Hurdle that afternoon slump by emphasizing quality protein!

  • Involve them, if they want to be involved. This one has absolutely been key for our household. My daughter - who is almost 5 - is greatly interested in making suggestions for her lunchbox, and she always wants a sneak peek before it gets zipped up in its case before we go drop her off at preschool. Here's how to involve your kids and spouse:

    :: Solicit grocery list and grocery shopping input. Your kids and spouse are likelier to eat lunches made of ingredients they've selected themselves. The bonus here is that - if they are skimming grocery ads for produce deals and accompanying you to local markets or farmers - they become more aware of seasonal crops and prices.

    :: Discuss a quick preview before the packing starts. Tell your kids or spouse the night before what you have in mind for the next day's lunches. If they aren't up for what you're planning, you can ask them to survey the fridge and pantry and come up with a healthy plan of their own.

    :: Have them do the packing. You can preprep some ingredients or set out some options and help them along the way, but getting your family to put their own effort into packing the lunch helps them to get mentally invested in the process. Keep things age appropriate in the packing process - an adult should slice fruit and veggies ahead for younger kids, for example, but the same younger kids can possibly spoon almond butter into a dip container by themselves.

  • Serve a rainbow. No, not only for the oft-touted benefit that foods of various colors have a wide variety of phytonutrients. Packing lunches with a rainbow of color is also very appealing to kids and results in them eating more of these healthy foods.

  • Mix up a selection of leftovers, fresh foods, and nonperishables. Having a good mix of these three categories means that your packed lunch will come together faster. It also generally provides a good variety and a nice selection of textures for your lunch eaters to explore. Examples:

    :: Leftovers. Last night's chili, or slices of the beef roast. Pieces of cubed leftover chicken.

    :: Fresh foods. Cut fruit and vegetables. Boiled eggs. Sliced cheese or whole fat unsweetened yoghurt (if you do dairy).

    :: Nonperishables. Nuts and natural nut butters. Sea Snax. Freeze dried unsweetened fruits. Coconut flakes. Paleo Kits. Canned tuna or salmon. Beef jerky.

  • Make fun shapes. If you're looking for buy-in from kids, getting familiar with bento lunchbox art is a great strategy. In one case for us, I learned about a four pack of stainless steel mini bento cutters that was around $5 - and they've been so durable and versatile for us, creating all kinds of adorable flower-shaped fruits, veggies, liverwurst, and cheese pieces in my daughter's lunch.

  • Make dips and dressings available. Dips are magical in their ability to win over reluctant lunch eaters! Here are a few ideas:

    :: Read your labels and try straight mustard or mustard horseradish for dipping steak or chicken pieces.

    :: For veggies, try combining coconut cream or sour cream with a bit of tamari (wheat free soy sauce) or coconut aminos and a little onion powder - this makes an onion dip!

    :: Almond butter is a great dip for apple slices or celery sticks.

    :: Tahini dressing could be a nice change of pace, or even try a cauliflower hummus.

    :: You could also make your own ranch dressing at home and be dazzled by the taste that fresh ranch can provide.

    :: Homemade mayo is stunningly simple to make, and could be a nice addition to a BLT salad as well.

    :: For a premade option, Wholly Guacamole makes some very handy and (last I checked the ingredient label) paleo-compatible guacamole that comes in a 100 calorie pack option - presealed premade guac that isn't brown by the time your kids get to it? That's convenient.

  • Finger foods! Who doesn't love a hands-on lunch? Roll quality lunchmeat (additive and preservative free when possible) around a pickle, or a piece of cheese if you do dairy. Serve up fresh snow peas, sliced up sticks of squash, cucumber coins, and baby carrots (don't forget the dip!). Stuff mini peppers with tuna salad (use the homemade mayo!) or another protein filling. Make muffin-size quiches with meat and colorful veggies added in.

  • Treats can facilitate buy-in. Yes, as mentioned above, conscientious carb consumption can keep you from plotzing mid-afternoon, but it's also true that a small treat can make a surprisingly big difference, especially to family members who are not totally sold on a lunchbox overhaul. Some ideas here:

    :: A trail mix with your spouse's favorite nuts, dried fruits, and unsweetened coconut flakes,

    :: A square of high quality dark chocolate,

    :: A coconut manna cup,

    :: A honey straw. These hold a teeny amount - about 1 tsp. - of honey, so they're more about the novelty factor,

    :: A lightly-honey-sweetened grain free coconut macaroon, or

    :: A delicious chocolate mousse made with (yes!) overripe avocado.

Relearning lunch-packing can be challenging - there's no question about that. But be encouraged - it does have a learning curve, and before long the practice of doing it adds up and lets you pull together lunches very efficiently.

How have you changed the lunches that you and your family are eating these days?


This post originally appeared as a January 18, 2012 guest post at Paleo Parents. Big thanks go to Stacy and Matt for giving me the opportunity!

Wednesday, November 30, 2011

New Series Coming This Week: The Real Food Advent Calendar, a Healthier Alternative


I'm super excited!!  A few weeks ago, I bought a "fill your own" advent calendar at IKEA, and starting tomorrow, December 1, I am going have a daily post through Christmas on the calendar's compartments' contents.

Advent is a special season built on anticipation - for Christians it's when we remember how long the world waited for our Savior, as we (in microcosm) now eagerly await the celebration of his birth. I loved advent calendars as a kid -- doing the countdown to Christmas was that much more special having a calendar to watch and a little daily treat (usually chocolate) to enjoy.

These days, advent calendars can be found in a wide range of prices and qualities - some can be had at a dollar store, while others can be purchased from high end chocolatiers, and feature very high quality chocolate.

As for us and our IKEA special, I enjoyed both the idea of knowing exactly what ingredients went into the treats and the ability to add a something more than just chocolate to those cute compartments - a little toy or ornament, perhaps, that my oldest could enjoy finding. It allowed me to customize the calendar exactly for my 4 year old's attention span and interest levels. In our house, we'll read a bit of scripture while opening our daily countdown drawer as well, which I hope adds to our sense of anticipation as we celebrate Christ's arrival as Emmanuel - "God with us".

Some strategies for this project:

  • I'll be using minimuffin cup liners to separate the treat from the toy inside each compartment. (Mine are silicone but disposable would work equally well.)

  • I'll be using the dollar store and the dollar section at Target for toy resources. (This project is also another great reason to surf the Target dollar section's seasonal stuff just after a holiday expires to get little fun items for pennies on the dollar.)

  • Lest you think I've already completely filled the calendar's compartments, nope! I'm only about three days out right now. My plan is to go in 3-4 day chunks of filling the drawers, which will hopefully be a doable pace. Maybe next year I'll have the benefit of experience on this and be more ahead of the game. ;-)

  • The treats will be varied in their real food content. Some might include dairy, or nuts, or eggs - and some small amounts of sugar in the form of high quality dark chocolate. The treats will all be gluten-free, however. If your household doesn't eat one or more of those ingredients and you're still hoping to fill an advent calendar of your own, then feel free to adapt or come up with treats that are better suited to your family's dietary restrictions instead!
To see all of my Real Food Advent Calendar 2011 posts, click here.

Are you and your family doing advent calendars this year? How do you celebrate the countdown to Christmas?

Sunday, November 20, 2011

Same Lunch, Different Eaters


Here's a lunch that we had at home last week. My 4.5 year old has become kind of resistant to cold greens of all kinds, but I'm OK with that, since she still watches me sometimes eat huge salads, and she'll still happily eat spinach or kale as part of a warm dish.

The above lunch demonstrates how you can create two distinct lunches without changing your actual game plan a whole lot. The only material difference is - her lunch has a cut up white potato, while mine has a pile of greens. I had my kitchen shears at the ready for much of the prep, and to each of our bowls I added:

  • Sliced red and yellow pepper
  • Sliced carrots
  • Sliced grassfed steak
  • Pistachios (mine, for the salad)
  • Sliced baby zucchini (mine, for the salad)
  • Homemade avocado ranch, drizzled on my salad, but in the littlest compartment for my daughter to dip her veggies

Have you turned your massive salad into a more tactile kid friendly lunch before? How'd you do it?

Tuesday, September 20, 2011

Today, Half Price on Paleo Krunch at Abe's Market via Eversave Voucher

Eversave has a good deal today for Abe's Market, which is a natural goods online store. $25 buys you $50 worth of credit at Abe'sMarket. That makes a lot of natural and organic products half price if you keep your total close to $50!

You can get a good deal on PaleoKrunch this way - because Abe's sells PaleoKrunch in cereal (2 tubs/pack) and granola bar format. PaleoKrunch is a granola-type cereal, but without grains, refined sugar, or any industrial oils. In fact, the ingredients are as follows:

Almond meal, shredded coconut, raw sunflower seeds, raw pumpkin seeds, almond slivers, coconut oil, honey, vanilla extract

Yum!! This looks like the perfect item to have on hand for when nostalgia for a bowl of cereal strikes, or for going camping/hiking, or pretty much anywhere you need a fast and grain-free sugar-free natural foods fix. Even better with the significant half-price discount!


~
Have you tried PaleoKrunch? What other products on Abe's Market caught your eye?


This post contains affiliate links. Thanks for supporting Primal Kitchen at no additional cost to you!

Thursday, September 15, 2011

Lunchbox #116 - How Does Your Garden Grow?

With liverwurst, and Kerrygold, and cucumbers all in a row!

A while back, in my DIY bento cheese moon and stars tutorial, reader Arual asked in a comment if cookie cutters might also work for the same idea. Reader Courtney in Oki also alluded to this.

I answered that yes, they definitely could, though I didn't have any of my own small enough to make stars for the boxes in my daughter's lunchbox.

But there was something else; I was laboring under the misconception that buying specialized bento art tools was an expensive proposition. Arual and Courtney had gotten my gears turning, and suddenly after a little browsing, I found some cute stainless steel bento mini cutters - 4 for around five bucks. Wow!

So here, you see the results of my first go with them:


Today, my preschooler's lunch featured (clockwise):

  • Some liverwurst (~ 2 slices' worth), Kerrygold cheese, and cucumber slices, all prettied up with the aid of some inexpensive stainless steel bento shape cutters (seen at right).
  • Organic whole milk yogurt with frozen red raspberries and a few drops of whole leaf stevia concentrate
  • A banana


~
This post contains an Amazon affiliate links. Thanks for supporting Primal Kitchen at no additional cost to you!

Tuesday, September 13, 2011

Tuna Stuffed Mini Peppers


I found a paleo-friendly alternative to the American lunchbox staple that is the tuna salad sandwich: Tuna salad stuffed peppers! Having located a canned tuna that has only olive oil (no soybean or canola oil), I made a batch of tuna salad last week and stuffed it into the mini peppers that we had picked up at Sam's Club. The peppers worked very well as a tidy vehicle for transporting tasty tuna salad into one's mouth.

To make your own tuna salad, try making your own paleo mayonnaise - there's a nice tutorial over at The Clothes Make the Girl. Or, you could do the quick'n'dirty shortcut that I did last week - full fat sour cream (ingredient: cultured cream) mixed with a paleo-friendly salsa verde and some Bubbies relish (which has no sweeteners like sugar or corn syrups added) - all mixed with the tuna. Given the right occasion I would definitely serve these up as an appetizer!

Thursday, September 8, 2011

Lunchbox #114


Today, my preschooler's lunch featured (clockwise):


  • Mini peppers stuffed with tuna salad (tutorial and close-ups here)
  • Strawberries
  • Coconut macaroons, similar to these
  • Sliced cucumber


~

Wednesday, September 7, 2011

Bento Art: The Moon is Made of Cheese


If you have a hunk of hard cheese in your fridge, you are only a couple of minutes away from a bit of lunchbox whimsy - get our your paring knife and let's get to work! Don't stress about perfection - just try several stars (large and small) and throw in a moon if you feel like it! What a fun surprise for the lunch eater. :)

Cheese Stars


Ingredients:
Hard cheese (I used Kerrygold Dubliner)

Materials:
Sharp paring knife
Cutting board

Directions:
Cut off a sturdy slice of hard cheese - 1/4 inch or so. Out of the slice, cut a pentagon as shown above. Then focus on each side of the pentagon, cutting a wide wide triangle out of each side.

Note: Save cheese scraps for a less artistic dish, like melting into an omelette or soup.


Cheese Moon


Ingredients:
Hard Cheese (I used Kerrygold Dubliner)

Materials:
Sharp paring knife
Cutting board

Directions:
Cut a thick (1/4") slice of cheese, and make a diagonal cut across the slice to create a right triangle. (See above.) At the right angle, cut a curve. At each of the smaller angles, slice off the tip of the slice, creating a half circle. Cut a curve inside the half-circle to create the inside crescent.

Note: Save cheese scraps for a less artistic dish, like melting into an omelette or soup.
Related Posts Plugin for WordPress, Blogger...